The Green/Red Bishop: When It's Safe to Hunt
Entry 1 fires. The General moved. The Rook's wall broke. Knights present.
You check one more thing:
Are the bands open?
♗ The Green/Red Bishop (Bands Open)
BBW (Bollinger Band Width) measures if Mike has room to move.
Formula:
BBW = (Upper Band - Lower Band) / MA × 100
Scaled by 10 for readability.
What it tells you:
- High BBW (bands wide) = Room to move, volatility present
- Low BBW (bands tight) = No room, squeeze, trap zone
Green/Red Bishop appears when bands are expanding:
- Green Bishop (♗) in Green Kingdom (Mike > Kijun)
- Red Bishop (♗) in Red Kingdom (Mike < Kijun)
Translation: Volatility is present. Safe to hunt.
🚪 The Doors Metaphor
Think of Bollinger Bands as doors:
Doors Open (High BBW):
- Upper and Lower bands far apart
- Mike has room to move
- Green/Red Bishop present
- Safe to trade
Doors Closed (Low BBW):
- Upper and Lower bands squeezed tight
- Mike trapped in narrow range
- Yellow Bishop present (compression warning)
- Don't trade
The Green/Red Bishop tells you:
"The doors are open. You have permission to move."
📊 BBW vs STD (Different Jobs)
You might think: "Isn't BBW the same as STD?"
No. Related, but different.
STD (Purple Bishop):
- Measures raw volatility (stress gauge)
- Shows if volatility is extreme (2x expansion)
- Always purple (independent)
- Job: Warning signal (climax, exit)
BBW (Green/Red Bishop):
- Measures band width (room to move)
- Shows if bands are open (expansion present)
- Kingdom-colored (depends on Kijun)
- Job: Permission signal (safe to trade)
STD = how hard Mike is working
BBW = how much room Mike has
Different perspectives. Both matter.
🎯 When to Trust the Green/Red Bishop
The Green/Red Bishop doesn't fire entries.
It confirms them.
Entry 1 WITH Green/Red Bishop:
Setup:
- Midas Bull rising (General advancing)
- TD Supply broken (Green Rook)
- Knights present (RVOL >= 1.2)
- Green Bishop present (bands open) ✅
Translation: Structure + volume + room to move = strong entry.
Entry 1 WITHOUT Green/Red Bishop:
Setup:
- Midas Bull rising (General advancing)
- TD Supply broken (Green Rook)
- Knights present (RVOL >= 1.2)
- No Bishop (bands squeezed) ❌
Translation: Structure + volume, but no room. Move likely fails. Pass or scout very small.
The Green/Red Bishop = confirmation layer.
Not required. But makes entries much stronger.
🟡 The Companion: Yellow Bishop (Compression)
The Green/Red Bishop has a warning system:
Yellow Bishop (♗) = Squeeze incoming.
- BBW in lowest 10th percentile (tight bands)
- Present for 3+ bars in last 5
- Always yellow (kingdom-independent)
Yellow Bishop warns:
"Bands are squeezed. Trap zone. Don't trade yet."
Wait for:
- Yellow Bishop disappears
- Green/Red Bishop appears (expansion starts)
- Then enter
Think of it as:
- Yellow Bishop = red light (stop, wait)
- Green/Red Bishop = green light (go, safe to hunt)
🔥 Real Examples
COIN Feb 6 - Entry 1 with Green Bishop:
10:15 AM:
- Midas Bull rising ✅
- TD Supply broken (Green Rook) ✅
- Knight present (RVOL 1.2) ✅
- Green Bishop present (BBW expanding) ✅
All four layers aligned.
Result: Mike climbs from +158F → +616F (T1 +458F move).
SPY Trap - Entry Without Bishop:
09:45 AM:
- Mike tests TD Demand
- Bounces +20F
- Knights present (RVOL 1.4)
- No Bishop (BBW still compressed)
Translation: Volume without room. Bounce dies.
Result: Mike bounces +20F, then fades -30F.
Without the Green/Red Bishop, move had no space.
🚨 BBW Expansion vs Compression (The Cycle)
Markets cycle between expansion and compression:
Phase 1: Compression (Yellow Bishop)
- Bands squeeze tight
- Mike trapped in narrow range
- Low volatility
- Don't trade (trap zone)
Phase 2: Expansion Starts (Green/Red Bishop appears)
- Bands begin to widen
- Mike breaks out of range
- Volatility arriving
- Safe to trade (doors opening)
Phase 3: Full Expansion
- Bands wide open
- Mike trending
- High volatility
- Best trading (room to run)
Phase 4: Exhaustion (Purple Bishop)
- STD spikes 2x (extreme)
- Climax move
- Exit signal (trend dying)
Phase 5: Back to Compression
- Bands squeeze again
- Mike consolidates
- Wait for next Yellow → Green/Red cycle
The Green/Red Bishop lives in Phases 2-3:
Expansion starting or sustained.
🎭 Green Bishop vs Red Bishop (Kingdom Colored)
The Bishop gets colored by the Kingdom:
Green Bishop (Mike > Kijun):
- Green Kingdom active
- Bullish permission
- Bands expanding for calls
- Safe to hunt long
Red Bishop (Mike < Kijun):
- Red Kingdom active
- Bearish permission
- Bands expanding for puts
- Safe to hunt short
Just like Rook, Knight, Pawn, etc.
The Bishop respects the Queen.
🏹 Entry 1: The Four Confirmations
At Entry 1, check all four:
1. The General (Midas):
- Midas Bull rising (calls) or Midas Bear falling (puts) ✅
2. The Rook (TD Lines):
- TD Supply broken (calls) or TD Demand broken (puts) ✅
3. The Knight (RVOL):
- RVOL >= 1.2 (volume present) ✅
4. The Green/Red Bishop (BBW):
- Bands expanding (room to move) ✅
All four present = strongest Entry 1.
Three present = good Entry 1.
Two present = weak Entry 1 (scout cautiously).
One present = pass.
💀 When the Green/Red Bishop is Lying
The Bishop can appear in range:
Scenario:
- Mike chopping +80F to +120F
- Repeated whipsaws
- BBW expanding from chop (not trend)
- Green/Red Bishop appears
Translation: Expansion from noise, not directional move.
How to tell the difference:
Trend expansion:
- Green/Red Bishop after Entry 1
- Mike moving directionally
- Structure breaking (Rook present)
Range expansion:
- Green/Red Bishop during back-and-forth
- Mike not trending
- No clear direction
The fix:
Only trust the Green/Red Bishop in context:
- With Entry 1 (General + Rook)
- With Knights (volume)
- With directional bias (not chop)
Don't enter just because bands opened during range.
🔱 The Confirmation Stack (Full Picture)
Entry 1 Fires
├─ Layer 1: The General (Midas moves)
├─ Layer 2: The Rook (TD wall breaks)
├─ Layer 3: The Knight (RVOL >= 1.2)
├─ Layer 4: The Green/Red Bishop (BBW expansion)
└─ All aligned = strongest entry

Entry 2 Fires
├─ Layer 1: The Queen (Kijun cross)
├─ Layer 2: The Pawn (Tenkan holds)
├─ Layer 3: The Knight (RVOL >= 1.2)
├─ Layer 4: The Green/Red Bishop (BBW expansion)
└─ Layer 5: The Cape (Z3 >= ±1.2)

Entry 3 Fires
├─ Layer 1: IB wall breaks
├─ Layer 2: Three Knights (RVOL >= 1.2)
├─ Layer 3: The Green/Red Bishop (BBW expansion)
├─ Layer 4: The Cape (Z3 >= ±1.2)
└─ All aligned = strongest Entry 3
The Green/Red Bishop appears throughout.
Not just Entry 1. Everywhere room to move matters.
📏 How BBW is Calculated
Formula:
BBW = ((Upper Band - Lower Band) / MA) × 100 / scaleFactor
Where:
- Upper Band = MA + (2 × STD)
- Lower Band = MA - (2 × STD)
- MA = 20-period moving average of Mike
- STD = standard deviation of Mike over 20 periods
- scaleFactor = 10 (for readability)
High BBW (5-10+):
- Bands wide
- Volatility present
- Green/Red Bishop likely
Low BBW (1-3):
- Bands tight
- Squeeze
- Yellow Bishop likely
🧠 BBW + STD + Yellow Bishop (The Trinity)
These three work together:
Yellow Bishop (Compression):
- BBW in lowest 10th percentile
- Squeeze warning
- Don't trade yet
Green/Red Bishop (Expansion):
- BBW expanding
- Room to move
- Safe to trade
Purple Bishop (Extreme):
- STD doubled (2x expansion)
- Volatility nuclear
- Exit signal
The cycle:
- Yellow Bishop (squeeze)
- Green/Red Bishop (expansion starts)
- Sustained expansion (trading phase)
- Purple Bishop (climax)
- Back to Yellow Bishop (consolidation)
❓ Questions
"Can I enter without the Green/Red Bishop?"
Yes, but weaker.
Entry 1 can fire with just:
- General (Midas)
- Rook (TD break)
But without the Green/Red Bishop:
- No room to move
- Move likely stalls
- Scout very small or pass
With the Green/Red Bishop:
- Room present
- Move has space
- Full scout entry
"What if Green/Red Bishop appears but no entry fires?"
Then just bands opening.
Expansion without structure = meaningless.
Need:
- General moving (Midas)
- Rook breaking (TD)
- Then Green/Red Bishop confirms
Bishop alone = nothing.
"How do I know if BBW is 'high' or 'low'?"
Relative to recent session.
Look at BBW over last 30-60 bars:
- Bottom 10% = compression (Yellow Bishop)
- Middle 80% = normal
- Top 10% = wide expansion
Or just watch for the Bishop symbols:
- 🟡 Yellow = squeezed
- ♗ Green/Red = expanded
"Does BBW work with STD?"
Yes. Related but different.
BBW = band width (room to move)
STD = raw volatility (stress level)
When STD spikes 2x → Purple Bishop (extreme)
When BBW expands → Green/Red Bishop (safe to trade)
Both use standard deviation, different applications.
See: Purple Bishop (STD) for extreme volatility signals.
"What if bands stay squeezed all session?"
Then don't trade.
Yellow Bishop present all day = squeeze, trap, no room.
Pass the session.
Not every day is tradeable.
Wait for expansion.
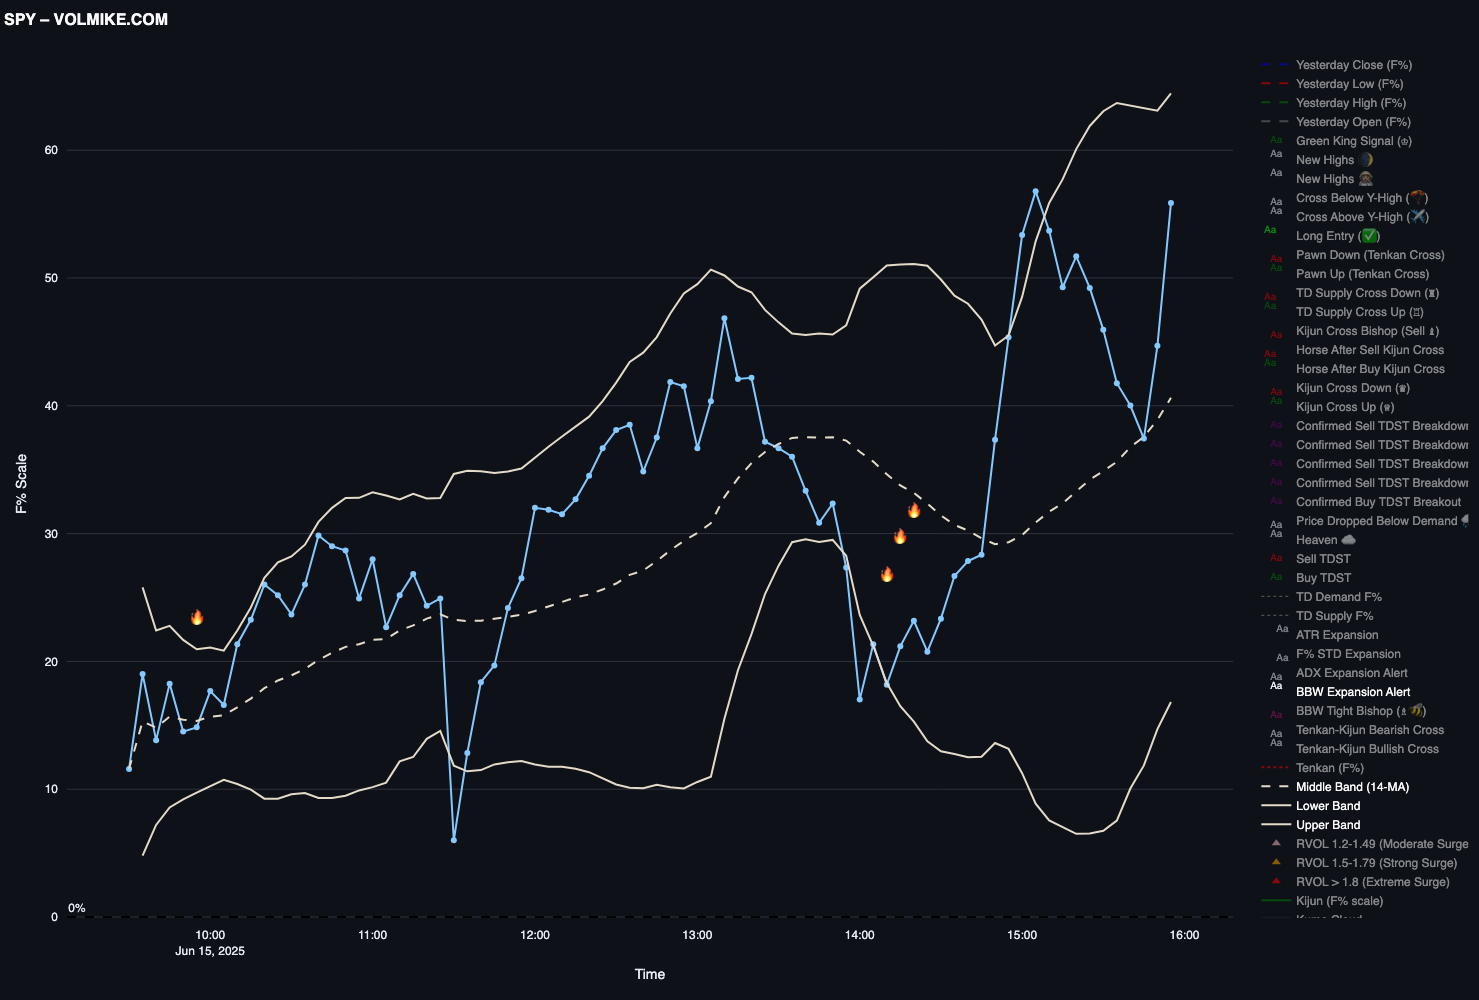
🚀 See It Live
What to look for:
- Green/Red Bishops (♗) when bands expand
- Yellow Bishops (♗) when bands squeeze
- At Entry 1: Green/Red Bishop present = stronger
- During trend: Green/Red Bishop sustained = room to run
- After climax: Purple Bishop fires, bands start to squeeze again
Watch the cycle.
🎯 The Bottom Line
The Green/Red Bishop tells you if the doors are open.
Doesn't fire entries. Confirms them.
BBW expansion = room to move.
BBW compression = trap zone.
At Entry 1:
General + Rook + Knight + Green/Red Bishop = strongest entry.
Without the Bishop? Move might stall. No room.
The Green/Red Bishop answers one question:
"Is there space for this move to run?"
Yes = trade.
No = pass.
That's it.
Share this:
Next: The Yellow Bishop (Compression) - The squeeze warning. When bands compress, Yellow Bishop warns: trap zone, don't trade. Wait for expansion. Calm before the storm.