The General: Why Even the Queen Respects Him (Midas)
You know the Queen (Kijun). She decides permission.
You know the Rook (TD Lines). He marks the fortress walls.
But who leads the campaign?
The General.
🎖️ Meet the General (Midas)
Midas is the supreme commander at Entry 1.
Not a permission filter (that's the Queen).
Not a wall (that's the Rook).
Midas is the campaign route:
- Midas Bull (green dashed line) = General advancing from the low
- Midas Bear (red dashed line) = General retreating from the high
Mike must follow the General to fire Entry 1.
The hierarchy:
Entry 1:
- The General leads (Midas)
- The Rook confirms (TD wall breaks)
Entry 2:
- The Queen leads (Kijun)
- The Pawn confirms (Tenkan holds)
Different commanders. Different entries.
🏕️ How Midas Works (The Anchor)
Midas is volume-weighted from session EXTREMES.
Midas Bull (Advancing from Low):
Step 1: Anchor
- Session opens
- Mike drops to +600F at 09:35 AM (session low, first occurrence)
- Midas Bull anchors here (General sets up camp at the low)
Step 2: Volume-Weighted Forward
- From 09:35 AM forward, calculate:
Midas Bull = Σ(Mike[i] × Volume[i]) / Σ(Volume[i])
- As volume accumulates, Midas Bull rises
- This is the General's campaign route (advancing from the low)
Step 3: Mike Follows
- Mike stays above Midas Bull (following the General)
- Mike breaks TD Supply (wall cleared)
- Entry 1 CALL fires (scout following General's campaign)
Midas Bear (Retreating from High):
Step 1: Anchor
- Mike spikes to +1200F at 12:30 PM (session high, first occurrence)
- Midas Bear anchors here (General sets up camp at the high)
Step 2: Volume-Weighted Forward
- From 12:30 PM forward, calculate:
Midas Bear = Σ(Mike[i] × Volume[i]) / Σ(Volume[i])
- As volume accumulates, Midas Bear falls
- This is the General's campaign route (retreating from the high)
Step 3: Mike Follows
- Mike stays below Midas Bear (following the General)
- Mike breaks TD Demand (wall cleared)
- Entry 1 PUT fires (scout following General's campaign)
Key insight:
Midas doesn't average the WHOLE session.
It averages FROM THE EXTREME forward.
This is where the battle started. Where the General began.
🆚 Midas vs VWAP (Why Midas is Better)
Most traders use VWAP (Volume-Weighted Average Price).
Problem: VWAP averages from session START.
VWAP:
VWAP = Σ(Price × Volume) / Σ(Volume)
From 09:30 AM (market open) forward.
What it shows: "Average fair value" for the whole session.
Midas:
Midas Bull = Σ(Mike × Volume) / Σ(Volume)
From session LOW (first occurrence) forward.
What it shows: "Where the battle is moving FROM" (the extreme).
Why Midas is better:
1. Battle Context:
- VWAP = average of the whole day (neutral reference)
- Midas = campaign route from the extreme (directional reference)
VWAP says: "Here's the average."
Midas says: "Here's where the General is advancing from."
2. Dynamic vs Static:
- VWAP anchor = session open (never changes)
- Midas anchor = session extreme (can re-anchor on new extreme)
VWAP = always looks at 09:30 AM start.
Midas = looks at where the battle actually began (the low or high).
3. Trend Context:
- VWAP = symmetric (no bias)
- Midas Bull = bullish bias (anchored at low, rising)
- Midas Bear = bearish bias (anchored at high, falling)
VWAP doesn't tell you trend direction.
Midas tells you which way the General is moving.
Example:
Session:
- Opens at +500F (09:30 AM)
- Drops to +300F (09:45 AM) ← session low
- Rallies to +700F by 11:00 AM
VWAP:
- Anchored at +500F (session open)
- Volume-weighted forward from there
- Might be at +480F by 11:00 AM
- Tells you: "Average fair value is +480F"
Midas Bull:
- Anchored at +300F (session low, 09:45 AM)
- Volume-weighted forward from there
- Might be at +420F by 11:00 AM
- Tells you: "General advancing from +300F, campaign route at +420F"
Which is more useful for Entry 1?
Midas. Because it shows the campaign route from the low.
Mike above +420F = following the General's advance.
🕐 The 2-6 Hour Stability Window
Here's the killer feature:
Most days, Midas anchors early and stays stable for 2-6 hours.
Typical Session:
09:30-10:30 AM:
- Mike swings around
- Session low hits at 09:45 AM (+300F)
- Midas Bull anchors at +300F
10:30 AM - 03:00 PM:
- No new session low
- Midas Bull stays anchored at +300F
- Volume accumulates, Midas Bull rises slowly (+300F → +350F → +380F)
- But anchor doesn't move (still at +300F low)
This 4.5-hour window = tradeable.
The General's campaign route is stable. No re-anchoring. No chaos.
Why this matters:
If Midas re-anchored every 30 minutes:
- Campaign route keeps moving
- No stability
- Can't trust Entry 1 logic
But Midas anchors early (first 1-2 hours) and holds:
- Campaign route set
- Stable reference
- Tradeable window of 2-6 hours
This is why Entry 1 works.
The General's campaign is consistent for most of the day.
🏔️ Re-Anchoring (When the General Moves Camp)
Rare days: new session low/high = Midas re-anchors.
Example: Midas Bull Re-Anchor
09:45 AM:
- Session low at +300F
- Midas Bull anchors here
10:00 AM - 01:00 PM:
- Mike rallies to +700F
- Midas Bull rising from +300F anchor
- Stable campaign
01:30 PM:
- Mike drops to +280F ← new session low
- Midas Bull re-anchors at +280F
- Old Midas Bull (+300F anchor) becomes "Old Midas" (resistance/support)
What this signals:
The General moved camp.
New battle starting. New low established.
Old Midas becomes structure:
- Old Midas Bull (anchored at +300F) = resistance
- Mike tests it later = structural level
This is what "Old MIDAS BLOCK" means (from AVGO chart).
The old anchor became a tested level.
How often does this happen?
Rarely.
Most days: one anchor, holds all session.
Volatile days or trend reversals: re-anchoring happens.
🎯 Entry 1 Logic (Following the General)
Entry 1 CALL fires when:
- Mike above Midas Bull (following General's advance) ✅
- Mike breaks TD Supply (wall cleared) ✅
- Location approved (not in LOFT) ✅
Example:
10:15 AM:
- Midas Bull at +350F (anchored at +300F low)
- Mike at +370F (above Midas Bull - following General)
- TD Supply at +365F
- Mike breaks above +365F (wall cleared)
- Entry 1 CALL fires
Translation: Scout following General's campaign. Wall broken. Go.
Entry 1 PUT fires when:
- Mike below Midas Bear (following General's retreat) ✅
- Mike breaks TD Demand (wall cleared) ✅
- Location approved (not in CELLAR) ✅
Example:
14:00 PM:
- Midas Bear at +650F (anchored at +700F high)
- Mike at +630F (below Midas Bear - following General)
- TD Demand at +635F
- Mike breaks below +635F (wall cleared)
- Entry 1 PUT fires
Translation: Scout following General's retreat. Wall broken. Go.
Without Midas:
You might enter just because TD Supply broke.
But if Mike is BELOW Midas Bull:
- Not following the General
- Campaign moving opposite direction
- Entry 1 doesn't fire (or fires weaker)
Midas = directional filter for Entry 1.
👑 Midas + Kijun (The Fragile Queen)
Sometimes the Queen and the General conflict:
Fragile Queen (Mike > Kijun but < Midas Bull):
Setup:
- Mike at +400F
- Kijun at +350F (Mike above - Green Kingdom)
- Midas Bull at +450F (Mike below - not following General)
Translation:
- Queen says: "Calls allowed" (Green Kingdom)
- General says: "I'm ahead of you, not supporting this" (Mike below Midas Bull)
This is a "Kingdom without foundation."
Permission without the General's backing.
What to do:
Be cautious.
- Queen approved (Mike > Kijun)
- But General not supporting (Mike < Midas Bull)
- Weaker regime
Don't trust it as much.
Entry 2 (Kijun cross) might fake out.
Why "Even the Queen Respects the General":
The General is on the battlefield:
- Absorbing volume all day
- Sees the battle firsthand
- Dynamic, responsive
The Queen is in the castle:
- Slow-moving (26-period average)
- Defines regime (permission)
- Static, lagging
When they conflict:
Trust the General over the Queen.
He's closer to the action.
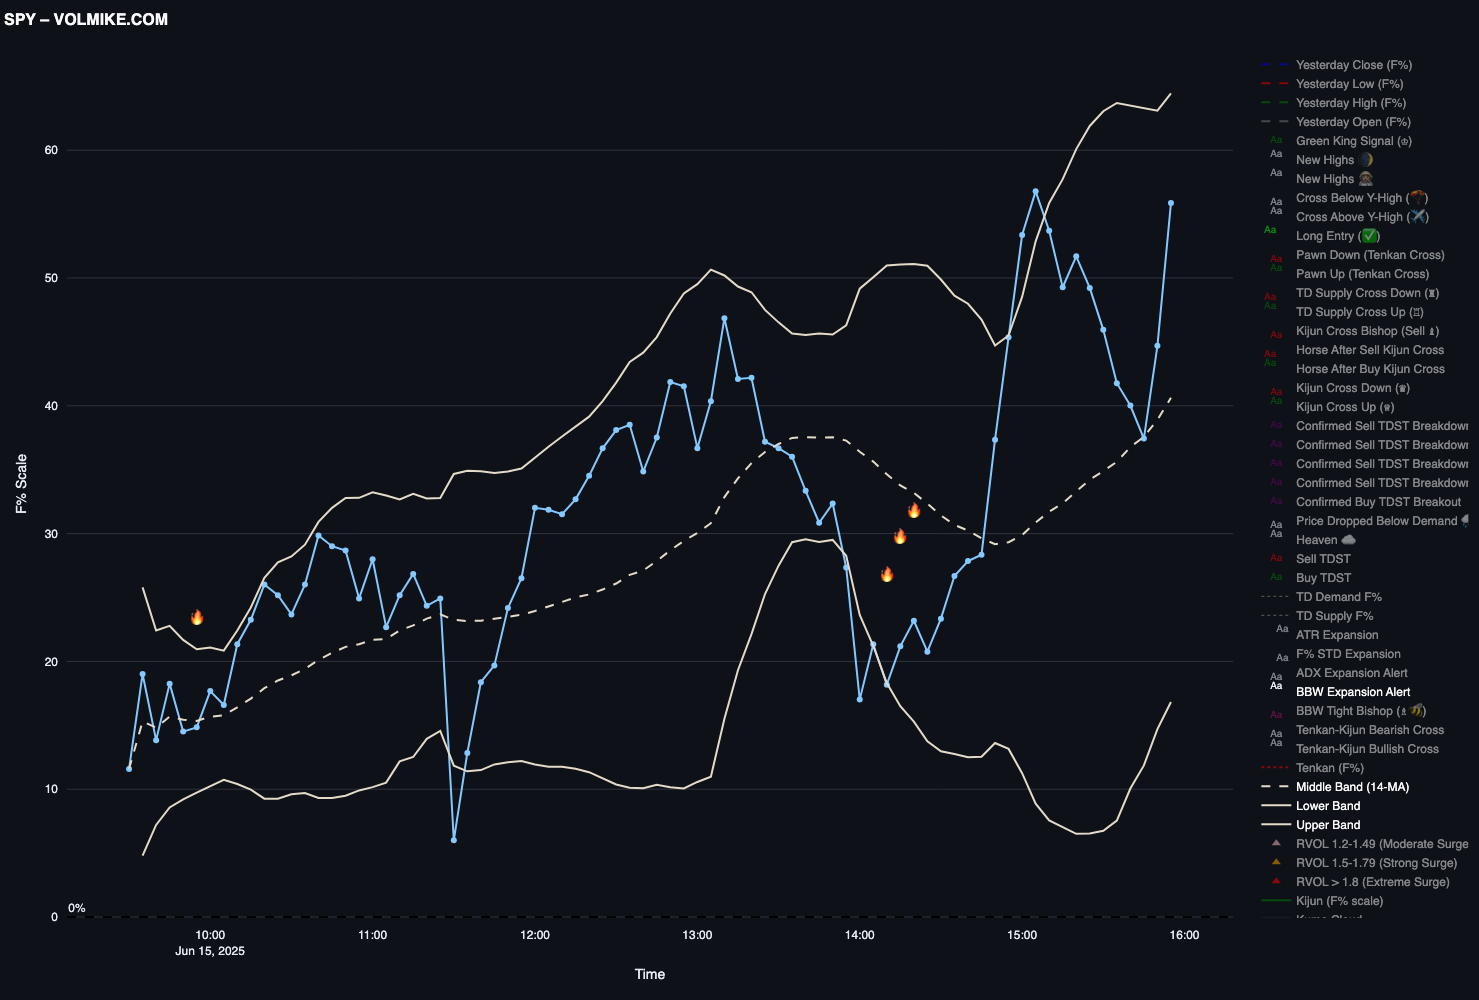
🎨 Visual Recognition
On the Terminal, look for:
Midas Bull (Green Dashed Line):
- Starts at session low
- Rises gradually (volume-weighted)
- Mike above it = following General up
Midas Bear (Red Dashed Line):
- Starts at session high
- Falls gradually (volume-weighted)
- Mike below it = following General down
Entry 1 visual setup:
CALLS:
- Mike climbing
- Above green dashed line (Midas Bull)
- Breaks TD Supply (horizontal resistance)
- Entry 1 fires
PUTS:
- Mike falling
- Below red dashed line (Midas Bear)
- Breaks TD Demand (horizontal support)
- Entry 1 fires
Simple visual rule:
Mike traveling with the dashed line = following the General.
🌍 Cross-Ticker Comparable
Midas is calculated on Mike (F-space), not price.
This means:
- SPY Midas and NVDA Midas behave the same
- No ticker-specific quirks
- Volume-weighted in normalized space
Why this matters:
VWAP on different tickers:
- SPY VWAP = $680
- NVDA VWAP = $145
- Can't compare directly
Midas on different tickers:
- SPY Midas Bull = +350F
- NVDA Midas Bull = +380F
- Can compare (both in F-space)
You can rank Entry 1s across tickers:
- SPY Entry 1: Mike +50F above Midas Bull
- NVDA Entry 1: Mike +80F above Midas Bull
NVDA Entry 1 stronger (more distance from anchor).
Cross-ticker comparable = professional edge.
🔥 Real Example: COIN Feb 6
Let's walk through a real session:
09:30 AM - Session Opens:
- COIN at $156.50
- Mike at +620F
09:35 AM - Session Low:
- COIN drops to $154.88
- Mike at +600F
- Midas Bull anchors here (General sets camp at the low)
09:40-10:10 AM - Rally Begins:
- Mike climbs to +750F
- Midas Bull rising from +600F anchor (volume accumulating)
- Midas Bull now at +640F
10:15 AM - Entry 1 CALL:
- Mike at +758F (118F above Midas Bull - following General)
- TD Supply at +750F
- Mike breaks above +750F
- Entry 1 CALL fires
Translation: Scout following General's advance. Wall broken. Strong entry.
10:15 AM - 03:50 PM - Sustained Rally:
- Mike climbs to +616F (close)
- Midas Bull stays anchored at +600F (no new session low)
- 5.5-hour stability window
- No re-anchoring, stable campaign
This is textbook Midas:
- Anchored early (09:35 AM)
- Stayed stable all session (no re-anchor)
- Entry 1 followed General's advance
- Tradeable window of 5.5 hours
💀 When Midas is Lying
Midas can give false signals on:
1. Opening Volatility:
First 30 minutes:
- Swings wild
- Session low/high might be noise
- Midas anchors on fake extreme
Fix: Wait 30-60 minutes for anchor to settle.
2. Re-Anchoring Days:
Volatile sessions:
- New lows/highs every hour
- Midas keeps re-anchoring
- No stability
Fix: Be cautious. Multiple re-anchors = choppy day. Reduce size.
3. Range Days:
Mike chopping:
- Session low at +300F (morning)
- Session high at +500F (morning)
- Mike chops +350F-+450F all day
- Both Midas Bull and Bear present
Fix: Range day. Neither General is winning. Pass or trade range edges.
🔱 The Command Structure
Entry 1 (Scout Entry)
├─ The General (Midas)
│   ├─ Leads the campaign
│   ├─ Volume-weighted from extremes
│   ├─ Anchors at low/high
│   └─ Mike must follow
└─ The Rook (TD Lines)
    ├─ Marks the walls
    ├─ Confirms structure break
    └─ Second-in-command

Entry 2 (Main Army)
├─ The Queen (Kijun)
│   ├─ Rules the regime
│   ├─ Decides permission
│   └─ Slow-moving
└─ The Pawn (Tenkan)
    ├─ Timing confirmation
    └─ Must hold
Different commanders for different entries.
The General leads Entry 1. The Queen leads Entry 2.
❓ Questions
"Can I enter if Mike is above Midas Bull but no TD break?"
No.
Entry 1 requires BOTH:
- Mike following Midas (General leading)
- TD wall breaking (Rook confirming)
Without the Rook, you have no structure confirmation.
General alone isn't enough.
"What if Mike crosses Midas Bull during the session?"
That's not an entry signal.
Mike crossing Midas = just changing position relative to General.
Entry 1 fires when:
- Mike ALREADY following Midas (above/below)
- AND breaks TD wall
The cross itself doesn't matter. The sustained position matters.
"How often does Midas re-anchor?"
Rarely on normal days.
Most sessions: anchor once (first 1-2 hours), hold all day.
Volatile days: might re-anchor 2-3 times.
Very volatile days: 4+ re-anchors (choppy, be cautious).
"Should I trust Fragile Queen (Mike > Kijun but < Midas Bull)?"
Be cautious.
- Queen approved (Green Kingdom)
- But General not supporting
This is weaker permission.
Entry 2 (Kijun cross) might fake out.
Better: Wait for Mike to cross above Midas Bull (General + Queen aligned).
"Does Midas work with other pieces?"
Yes:
- Entry 1: Midas + Rook (TD)
- Knights: Volume supporting General's campaign
- Green/Red Bishop: Bands expanding as General advances
- Z3 (Cape): Momentum confirming General's move
All pieces support the General's campaign.
🚀 See It Live
What to look for:
- Green dashed line (Midas Bull) rising from session low
- Red dashed line (Midas Bear) falling from session high
- Mike traveling with the dashed line (following the General)
- Entry 1 fires when Mike follows Midas AND breaks TD wall
- Stability: Most days, dashed line stays anchored for hours
Watch the General lead.
🎯 The Bottom Line
Midas is the General.
Supreme commander at Entry 1.
Not VWAP:
- VWAP = average from session start
- Midas = volume-weighted from EXTREMES
Anchors:
- Midas Bull = session low (advancing)
- Midas Bear = session high (retreating)
Stability:
- Most days: anchors early, holds 2-6 hours
- Tradeable window
Entry 1 fires when:
Mike follows the General (above Midas Bull or below Midas Bear) AND breaks the Rook's wall (TD Supply/Demand)
When Midas conflicts with Kijun (Fragile Queen):
Trust the General. He's on the battlefield.
The General leads the campaign. The Queen rules the regime.
Different jobs. Both matter.
Share this:
Next: The Cape (Z3) - Momentum armor. Z3 uses STD to normalize 3-bar momentum. Z3 >= ±1.2 = engine ON. Critical at Reclaim (🧿) and Entry 2/Entry 3 confirmation.